All posts by anarchistrrl

DIY solar generator

Solar generators are great disaster preparedness tools that are worth getting if you can afford them. But they have a few problems.

  1. They’re expensive.
  2. They’re hard to modify. They lock you into a particular set of features that’s hard to expand on without buying a dozen different adapters, or taking the whole thing apart to cannibalize parts, and re-building the whole thing into a configuration you actually want with a lot of probably pretty sub-standard components. This is because they’re made by capitalists who will often cut corners to give you the cheapest (for them) version of the very expensive thing you think you’re paying for.
  3. They lack creativity.

If you can’t afford one of the myriad battery boxes you see advertised all over the place like Jackery and EcoFlow, building one yourself can save you some money. To be honest, even the components for DIY projects are getting so expensive that sometimes you save more money by buying something pre-manufactured. And I’m not even talking about “if you factor in the time you spend building it”. That’s just how fucked the supply chains are.

But DIYing a battery box offers a couple of advantages that the manufactured ones don’t.

  1. Less money all at once: You are able to spend money on one or two component at a time, rather than surrendering your whole paycheck to Jeff Bezos.
  2. Modular: You can configure these components in any way you want. You can add and remove parts, or you can easily cannibalize the whole thing later on if you need parts for a more pressing project.
  3. Repairable: If you know how to build it, you know how to fix it.

Ice fishermen have been building battery boxes similar to these for a long time. There are some significant differences in the end products because they’re built for different purposes. But if you want to build your own battery box, they might be a good source of information for you.

TOOLS USED

  • drill
  • step drill bit
  • Oscillating tool / box knife
  • wrenches/pliers
  • Ratcheting wire crimpers
  • Ratcheting PowerPole crimpers
  • Automatic wire strippers

THE BATTERY

The most important component of the battery box is obviously the battery. Lithium Iron Phosphate (LiFePo4 or LFP) has pretty quickly supplanted Lead-Acid batteries and pretty much all other battery chemistries in the realm of amateur radio. The advantages of LiFePo4 over lead-acid are many:

  • 3X higher energy density,
  • more charge/discharge cycles,
  • you can actually completely discharge a LiFePo4 battery without damaging the cells, unlike a lead-acid battery which can be damaged if discharged to below 20%,
  • pretty constant voltage,
  • no hydrogen gas or other fumes
  • not made of literally brain-destroying lead or bone-melting acid.

And if you wonder why we didn’t choose Lithium Ion or Lithium Polymer batteries for this build, it’s because even though LiIon and LiPo are a little cheaper and have a higher energy density, LiFePo4 has a major advantage when it comes to safety: This type of battery does not catch fire nearly as easily as liIon or LiPo batteries.

Tesla Cybertruck on fire

A 100 Ah LiFePo4 battery is about the size of a car battery, but weighs only about 9kG (20Lbs). Unfortunately, there are about a thousand different brands of LiFePo4 batteries and only a few of them have “good” reputations, which are far more expensive than the other unknown brands. Long story short, quality control is kind of a crap-shoot on this stuff if you’re trying to save money, but the good news is that due to the LiFePo4 battery chemistry being very safe, your house (probably) won’t catch fire if it fails. But don’t worry, we’re going to take other precautions as well.

BTW, you can also build your own LiFePo4 battery from individual cells and a BMS, but that’s a whole other very deep topic, and something we haven’t tried yet.

In any case, we weren’t about to spend $900 on a fucking battery. We found a 100 Ah battery from a company called WattCycle for about $165. There weren’t a lot of reviews, but you can’t trust reviews anyway due to enshittification. There were no reports of explosions and it seemed like a decent price.

This battery can allegedly handle a maximum continuous discharge current of 100 Amps, which means it could discharge 100 amps for about 1 hour before the battery dies.

(Or 50 amps for 2 hours, 25 Amps for 4 hours, 12.5 Amps for 8 hours, 1 Amp for 100 hours, etc. If you don’t know what the Amp-hour rating on a battery means, now you know.)

We don’t really trust that statement, because that would mean that the wires going from the cells to the lugs would be at least 4 AWG copper wire, which is kind of expensive. We suspect that the people who made this battery are a little “smarter” with their money than they are with their mouths.

But it doesn’t matter, since we don’t expect to pull even half of that from this battery at any one time, and all connections will be fused anyway.

We’re using 12 AWG copper wire for most connections to the battery. 12 AWG wire can handle a maximum current of 20 Amps. And since none of these circuits should really pull any more than 15 Amps, that fits well within the 80% Rule. Our panel has 5 switches, and there’s another switch for the 20V circuit as well. Assuming each circuit would be On and pulling their maximum current of 15 Amps (a pretty unlikely scenario), that means that the maximum possible load we could put on the battery is 90 Amps which is ~allegedly~ well within the 100A spec for this battery. Furthermore, some of these circuits will actually have 10 or even 5 Amp fuses, so really we should be pretty safe.

Because of that potential 90 Amp total load, we actually need to use much larger wire to connect directly from the positive terminal of the battery to the 100 Amp cutoff switch, to the fuse block, and then to the negative side of the battery.

The battery’s BMS does have over-current protection, but it’s apparently programmed to quite a high current so we’re better off relying on our fused circuits. In theory, the BMS could be re-programmed, but it’s locked inside the plastic case and we don’t want to compromise any waterproofing that may provide.

The battery has high-temperature and low-temperature protection as well, because running the battery outside the -20°C to 60°C (-4°F to 140°F) range can cause damage to the cells.

BATTERY MONITORING

It’s important to have an idea of the battery’s state of charge, how much load is on it, and how much longer it can run. There are a lot of battery monitors out there. Mainly there are types that use a shunt, and there are types that use a hall sensor. Some even have Bluetooth built in so you can monitor the battery from your phone, but who needs another app.

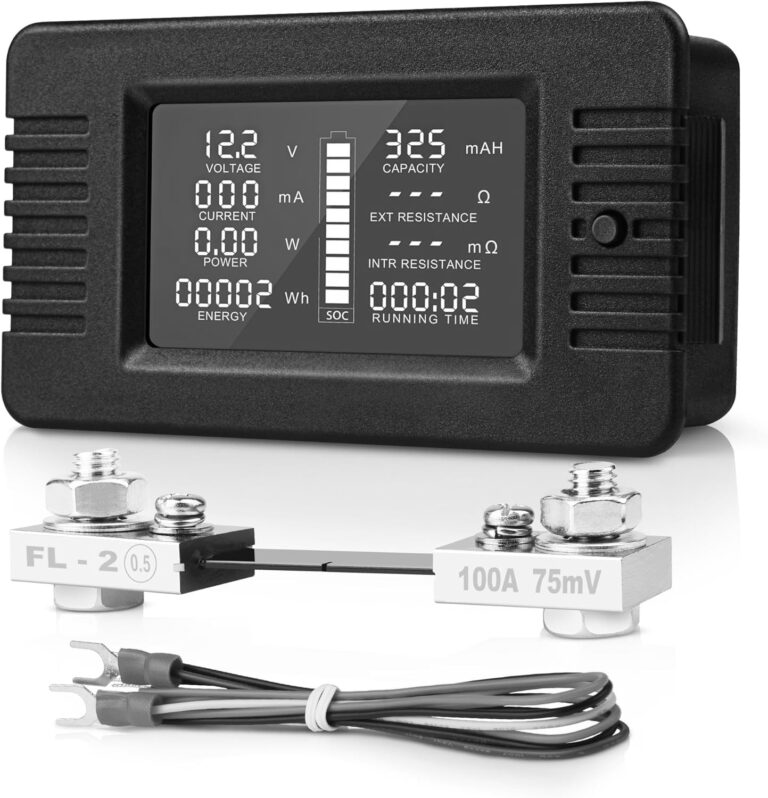
We chose a pretty cheap shunt-type battery monitor. There are instructions on the back that show you how to wire it up to a battery.

VERY IMPORTANT about these types of battery monitors: The battery monitor should be fully charged when you wire it up, otherwise the monitor will just assume that it’s fully charged when it’s not, and that could create problems and confusion down the road.

Another important point about these shunts, at least with a battery as large as the one we’re using, is that it took a VERY long time for it to “learn” what the capacity of the battery was. It needs to stay connected while it slowly counts how many miliAmp Hours the connected battery has.

THE SOLAR CHARGE CONTROLLER

Solar Charge Controller

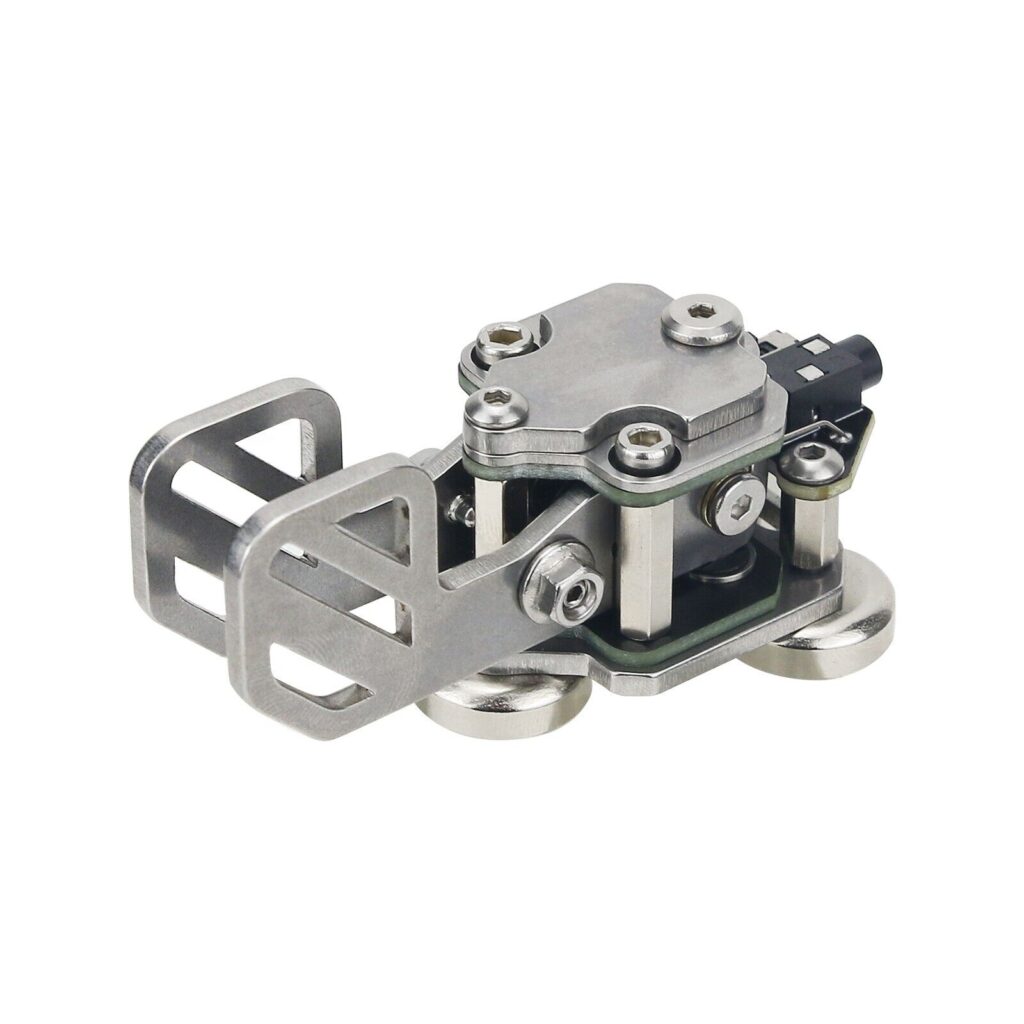
A solar charge controller is a device that sits between the solar panel and the battery and makes sure that the battery doesn’t get overcharged and that current flows only from the solar panel to the battery, and not the other way around.

There are two main types of solar charge controllers: PWM and MPPT.

PWM stands for “Pulse Width Modulation”. PWM charge controllers tend to be cheaper than MPPT, but they’re less efficient and they have a tendency to generate RF interference. Think of PWM as a switch that automatically turns off and on extremely fast in order to prevent too much power from getting to the battery and overcharging it.

MPPT stands for “Maximum Power Point Tracking”. These are much more efficient charge controllers that, generally speaking, generate less RF interference, but they tend to be more expensive.

There are exceptions to the RF interference. The PWM charge controllers sold by Bioenno have been shown to not create RFI, while the opposite is true of some of the cheaper MPPT controllers that are available. I myself have bought a 2-pack of PWM controllers, one of which created interference, the other of which did not.

Here’s what to do if you get a noisy solar charge controller. (Put ferrite beads on it.)

If you plan to generate power using a wind turbine, that’s a whole other can of worms. But here’s an article about that to get you started.
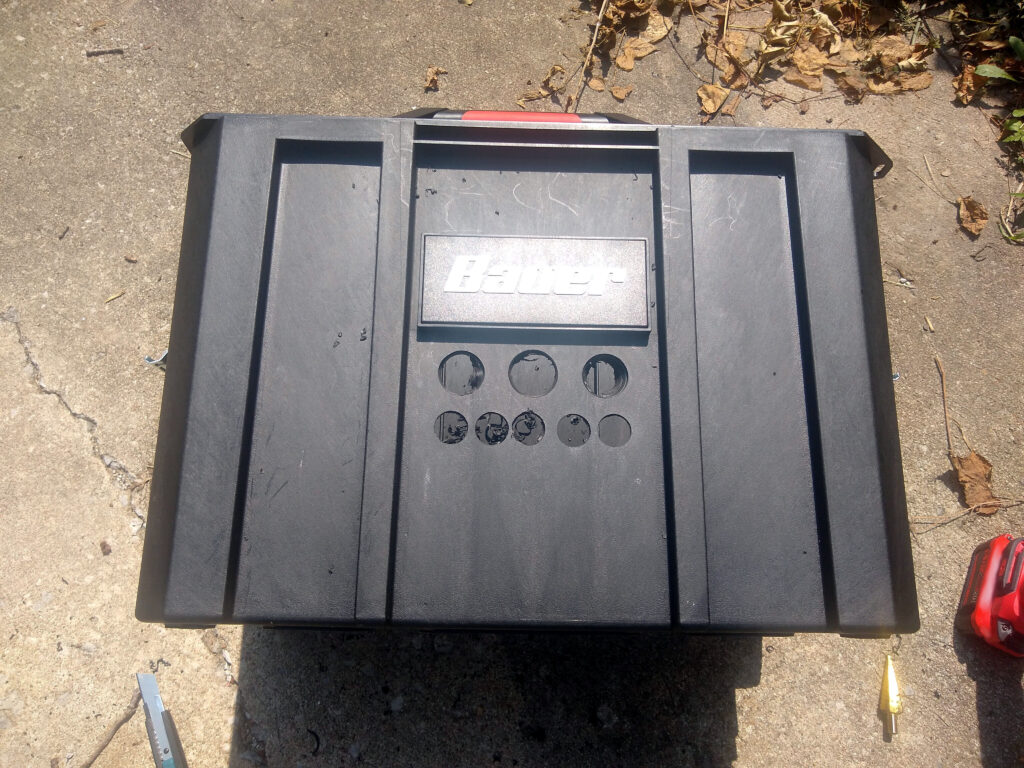
THE BOX

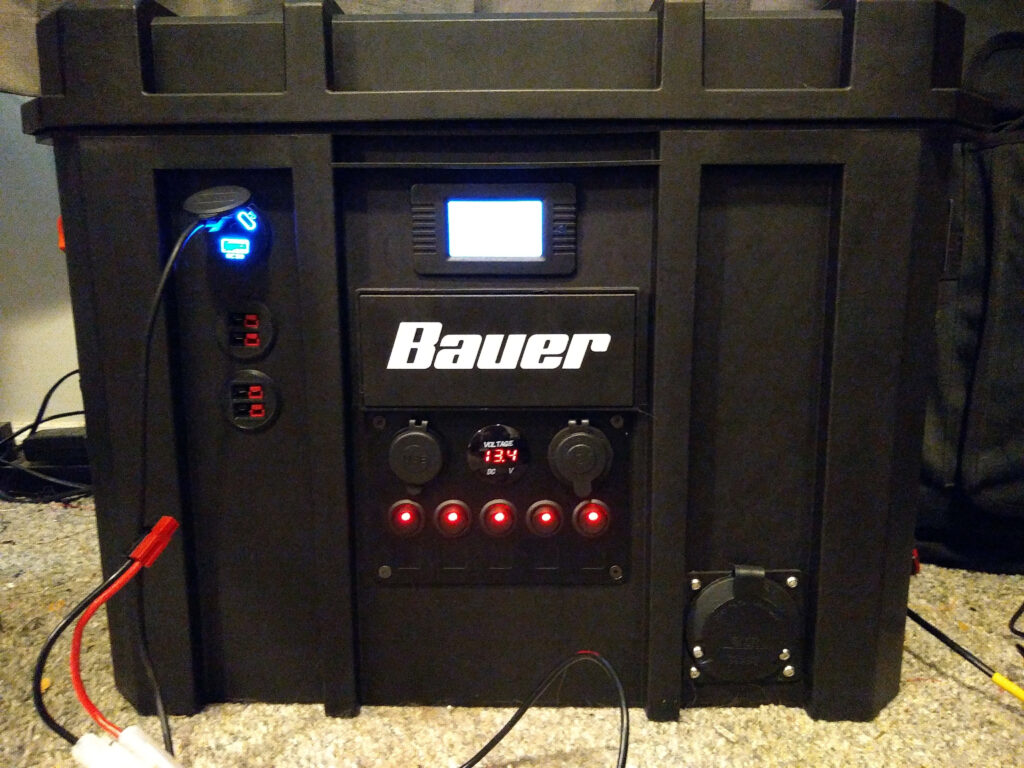
The box we’ve chosen is a Bauer modular rolling toolbox from Harbor Freight.

Modular Rolling Tool Box

You can and should use whatever kind of container you want, but we think that due to their relative weather resistance, these modular stackable toolboxes – of which there are many brands, none of which are compatible with each other, of course – hold the potential to expand into a mobile modular system for different purposes such as ham radio, computer networking, or even a cooking station for a squat, encampment, or commune.

But if modularity and weather resistance is not something you need, you could easily build a similar system into a plastic tote, an old suitcase, or a wooden box. It’s up to you. Other types of containers would certainly fit better on a bike trailer than what we’ve chosen here.

“PANEL MOUNT” EVERYTHING

5 Gang ON OFF Toggle 12V Car Switch Panel Dual USB Socket Charger 4.2A ...
This is a “5 Gang ON OFF Toggle 12V Car Switch Panel Dual USB Socket Charger…” yadda yadda etc. according to the online listing.

The trick to finding all the little ports you want on the outside of the box is to search “panel mount” or “chassis mount” in front of everything you need. Panel mount USB C, Panel mount Power Poles, Panel mount switches, Panel mount battery monitor, etc.

If you’re in a situation where you can’t have things delivered to you, look for an RV or boating supply store you can get to. They should have a lot of this stuff.

We bought most of these components on AliExpress. We know people have feelings about that sort of thing, but it’s the same place Amazon buys it from before they double the price.

WIRE AND FUSES

We went with 12 AWG silicone-jacketed copper wire for all the connections from the fuse box to all the connectors and devices. The maximum current rating for this wire is 20 Amps, which according to the 80% rule means we should really stay under 15 Amps for each circuit anyway.

We used 4 AWG copper wire for the main circuit between the battery, cutoff switch, and fuse block.

The 4 AWG ring terminals had to be filed down so that they would fit on the cutoff switch.

There are several tools for crimping large gauge cables like this. The best is probably a hammer crimp tool, but one of us already had a table vise so we used that instead.

If you are wiring two or more batteries together, you should definitely use at least 4 AWG wire or possibly even 1/0 welding cable in the shortest lengths possible between the batteries.

The manual for our battery actually lists 12AWG wire as having an ampacity of 25 Amps. This may be true in most situations, but given that most sources say the ampactiy of 12AWG copper wire at 60 C is 20 Amps and we don’t really know how hot it might get inside this box, it’s just safer to go with the lower estimates.

Using wire that is too thin in any of these circuits creates a fire hazard!

So the “hot” side of each circuit will have a 15 Amp (or lower) fuse going directly to the positive side of the battery. It’s really a good idea to also fuse the negative side of each circuit as well, but 99% of problems that could cause a fuse to blow will occur on the positive side of the power source.

A mini-rant about Copper-Clad Aluminum (CCA) wire

TL;DR, Use pure copper wire if you can. Don’t use CCA wire if you don’t have to. If you do have to use it, use thicker wire than you think you need.

There was a short period of time in the 1970s in the so-called “US” when buildings were being built with copper-clad aluminum electrical wiring due to being cheaper than pure copper wire. The practice was generally abandoned after it became apparent that CCA wire tended to get much hotter than pure copper wire, creating a fire hazard. But it’s not like this was made illegal or anything. In fact, CCA wire is being used again in some newly-constructed homes, saving future slumlords literally TENS of dollars per McMansion.

CCA wire is also available online to regular people working on their DIY electronics projects, and it’s not always obvious what you’re getting. There is some math you can do to figure out what gauge of CCA wire should be used safely for a given current, but as far as we can tell it’s based on a combination of rules-of-thumb and straight up guessing the ratio of the copper-aluminum composition which doesn’t seem to be standardized. So it’s best to just look carefully and make sure you’re using pure copper wire.

THE INVERTER

We’re using a 500 watt “pure sine wave” inverter. This actually isn’t a very good inverter, but we really should only use the inverter as a last resort anyway.

The reason to avoid using an inverter as much as possible is because generally speaking, at least 10% of the energy is lost in the conversion (or inversion, as it were) from DC to AC. That might not sound like a lot, but when you consider that most of the small appliances we use on a daily basis actually convert the Alternating Current coming out of the wall into Direct Current, you’re basically simulating that same process by converting the DC of the battery to AC, and adding a whole new layer of inefficiency by turning that current back into DC so your device can use it. It’s an enormous waste of energy for most applications, but sometimes you have to do it.

This could be the difference between running a CPAP machine for one night or running it for 3 nights by using a DC-DC converter, so it’s important to think about this stuff.

The inverter came with its own 12 AWG wire and two 45 Amp fuses, so we ran this directly to the battery and ran a panel mount 120V AC receptacle to the front of the box.

https://www.youtube.com/watch?v=UAZGX379dmc Converting “ON-Grid” Electronics to “Off-Grid” – DC to DC Conversion – Everlanders

BUCK-BOOST CONVERTER

Buck-Boost converter and a pair of blue and black Power Pole connectors mounted into the plastic box.

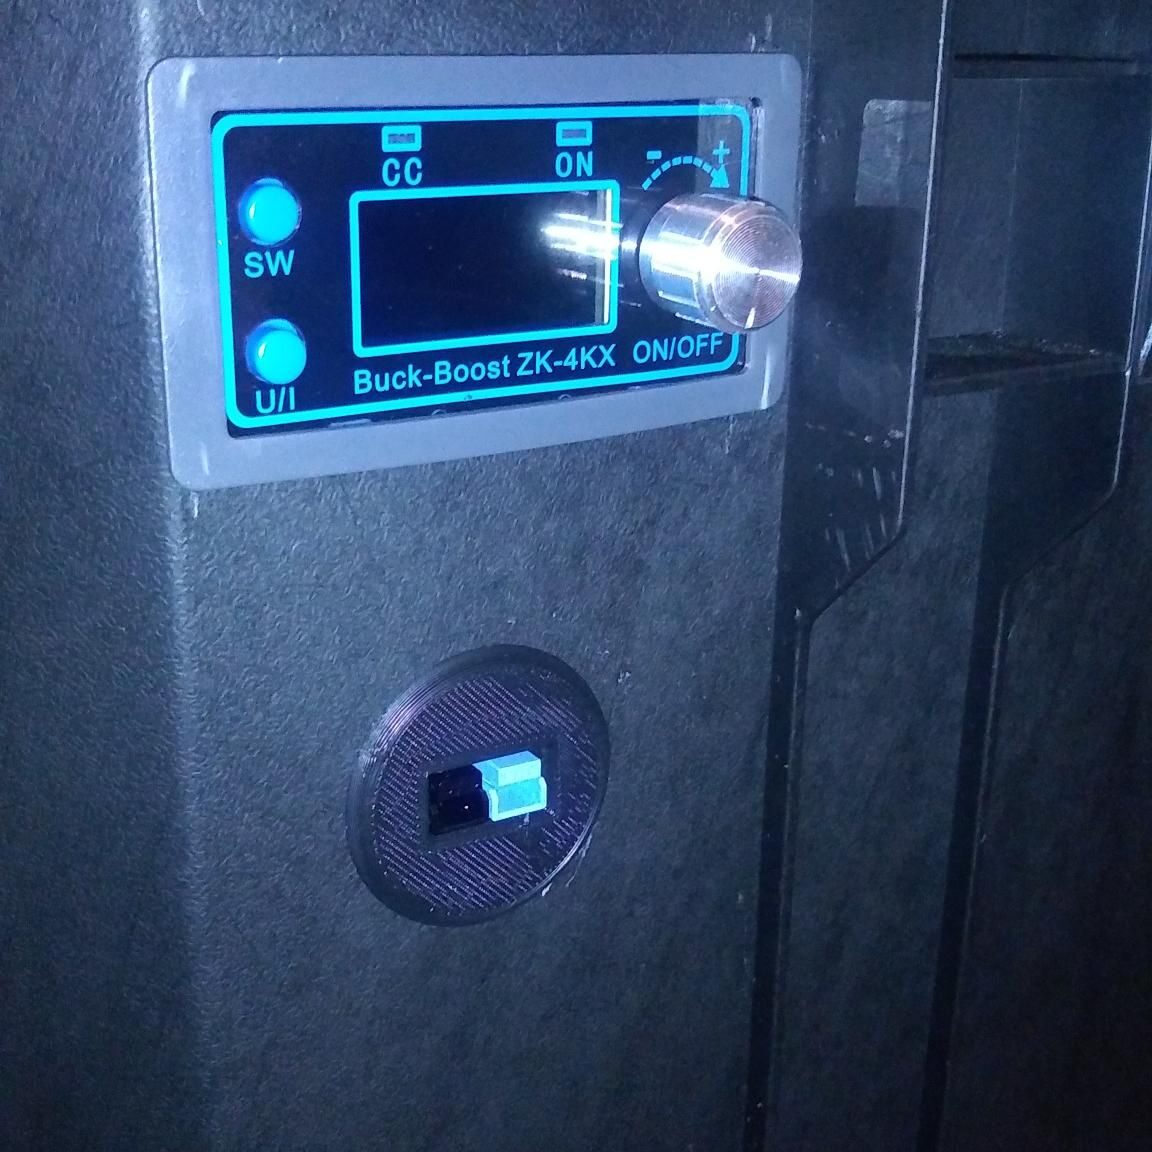
Due to the relative inefficiency of AC inverters, and an abundance of DC devices that require voltages other than 12V or 5V, we decided to do something we haven’t seen on other battery boxes. We’ve added a constant-current (CC) constant-voltage (CV) buck-boost converter. This is an adjustable DC-DC converter that can step the voltage up or down from 12V and supply it to a device at a specified current.

Mostly this is for laptops and power tool batteries which require about 20V DC.

There are a lot of guides out there on how to convert older hardware to be compatible with USB C and therefore be able to automatically negotiate voltage between source and load, but it’s a hell of a lot easier and cheaper just to snip off the cables that go to each of these devices and put Power Poles on them. In order to hopefully avoid confusion, we used blue Power Pole connectors on the positive side of the 20V leads, so that they are different from the red leads of the more common 12V connection.

https://www.youtube.com/watch?v=ZEa1fOCIAyE Boost Your Electronics Skills with Boost Converters. A Tutorial – The Post Apocalyptic Inventor

https://www.thingiverse.com/thing:3726066 PowerPole mount – ElectroAelex26

https://www.youtube.com/watch?v=ikTsE-UGN1s Xys3580 Dc Dc Buck Boost Converter Cc Cv 0 6 36V 5A Power Module Lab PSU Build – 1formatica

BUILD THE DAMN THING

The first thing we did was decide where the main switch panel would go. We laid it on the front of the box and marked the holes for all the switches with a pencil. Using a stepped drill bit, we cut the holes for the switches.
An oscillating tool was used to cut an opening for the battery monitor, but a box cutter can also be used.
cut a piece of scrap plywood to fit on the back side of the box, and pre-drill holes so that it could be bolted on later. Lay out the fuse box, solar charge controller, and inverter, and mount them to the plywood.

A group 24 battery tray was adhered to the bottom center of the box, and the battery was placed inside.

inside of the box
completed solar generator

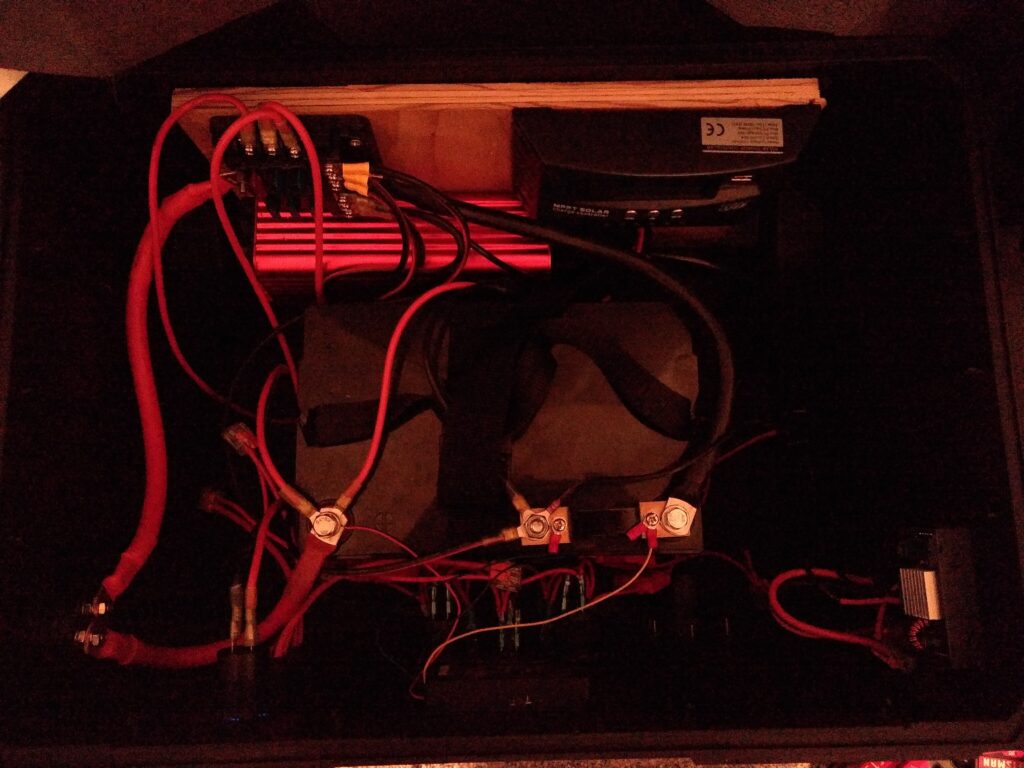
Aside from a lot of wire cutting, terminal crimping, and making sure the wires all go to the right places, that’s pretty much it! We would provide wiring diagrams, but they would probably just be more confusing than helpful, both for author and audience. Even though it looks like a mess in there, this stuff is not too hard to figure out once you’re sitting in front of it.

https://www.youtube.com/watch?v=toChngkLsJ8

https://www.youtube.com/watch?v=Pn0cmw5dKmk

July Update

This is an update on some of our activities for the month of July, 2024.

It’s hot as fuck outside, and the engineers are overworked.

CW studies continue.

Experiments with 17-foot telescopic whip antennas continue.

One of us is building a 12v DC refrigerator and a large backup battery box. Writeups with images will follow, assuming these projects ever get finished.

The biggest communications-related story this month is obviously the massive Crowdstrike failure. A faulty update on July 19th caused the largest IT outage in history.

While the popular takeaway from this story is that tech workers should not deploy on Fridays – a take which implies that blame rests solely on one person or a small team – we think the larger lesson here is that modern Capitalist industrial infrastructure is an albatross. It’s large, unwieldy, and contains many single points of failure. Too much rests upon the shoulders of too few people.

And no, ham radio is not the answer to this, but it could be part of a solution. If telephone and Internet systems had blacked out, even on a local level, it would be important to have a backup. Whether that’s a blister pack FRS radio or a full blown HF base station or anything between, that set of skills and equipment could be part of an ad-hoc communications infrastructure with no possibility of this type of cascading failure for everyone who uses it.

It should be noted that while the Crowdstrike outage seems to have impacted “consumer” level communications much less than commercial, industrial and government systems – the issue of corporate consolidation of local mass media has been quite the can of worms for a long time and does have a major impact on local communities.

To be honest, it would be easy to point to this incident and say “See? This is why you need to get into ham radio, or solar power, or canning vegetables…etc.” But the truth is that most of this stuff works for most people, most of the time. So we don’t really want to sound alarmist. But it’s also true that we started to see the cracks in these systems years ago and they’re getting bigger with climate change, the housing crisis, and massive wealth disparity. The bigger these cracks get, the more people are going to fall through (as hundreds of millions already have), and the more we’ll need to rely on ourselves and each other when we fall through these cracks.

The apocalypse is here. It’s just not equally distributed. ~Margaret Killjoy

So what can you do? Short of setting up a separate “air-gapped” Windows computer in case this sort of thing ever happens again, it may be more worth while to learn how to use other systems such as Linux. Maybe set up a flash drive with different operating systems on it ready to install in case of a prolonged outage or outright destruction of your primary operating system, or just in case some other kind of bullshit happens to your computer and you can’t afford Windows. And it should probably go without saying: Back up your shit!

(and have a backup power source as well as lights and fans…and a water filter…and fix your bike…and grow food…and have a potluck…)

June Update

This is an update of some of our activities for the month of June, 2024.

Field Day was June 22-23. Some of us helped with organizational duties, made contacts, and helped troubleshoot antenna problems at our various clubs’ Field Day locations.

We have noticed an increase of local Meshtastic activity, although there seems to be a dearth of actual conversations happening. It’s cool that people are excited about expanding the network, and using nodes as beacons is cool, but do y’all maybe wanna…talk to each other?

One of us did a POTA with the 17′ telescopic whip. Despite forgetting to bring the NanoVNA to check the SWR, the fully extended whip with four 16 foot radials was perfect for the 20 meter phone portion. The SWR bridge built into most HF radios does come in handy, as it turns out.

The ARRL’s Logbook of the World is back up, after an apparent cyberattack caused it to shut down for several weeks. LotW is now working through an intense backlog of QSOs. Some have questioned whether the cyberattack may have originated with a disgruntled employee, or whether the long outage may be being used as a prelude to rebuild LotW from the ground up and start charging money for its use. Such questions are fueled by longstanding complaints of a lack of transparency and recent dues increases coinciding with cutbacks to member services.

We question if such a large online system for verifying ham radio contacts – the albatross that is Logbook of the World – should be centralized in the first place. Doubtless we are not the first to think of this, and someone is likely working on a decentralized alternative as we speak.

May Update

This is an update of some of our activities from the month of May, 2024.

First, we hope that everyone had a happy May Day filled with whatever pleases you. For us, it was very nice to see that someone ran a special event station for International Workers’ Day during the first week of May.

We also welcomed a new comrade this month. They are a longtime community organizer from the Pacific Northwest who is passionate about radio as a community tool for building connections and emergency response networks. They are currently learning Morse code and scheming about the next antenna build.

One of our comrades has been studying CW and following this pretty decent YouTube series. https://m.youtube.com/watch?v=irpAeqkr11Q&list=PLuvVda3FOP_2dkB4pyY7LplwxG1nNJ01J&index=1&pp=iAQB

At least two of us have acquired – or will soon acquire – a 17 foot stainless steel telescopic whip antenna. This is a very versatile piece of equipment which can be used in many configurations. Fully-extended, such an antenna is resonant down to the 20 meter band, and can be shortened to be resonant up to the 6 meter band. However, there are many supplementary pieces of equipment that can be DIYed from basic hardware store material such as PVC pipe and copper wire. Air core inductors for bottom- or top-loading the antenna, clip-lead wire extensions, and transformers could all be used to extend the useful bandwidth of the antenna down to the lower bands from 30 and 40 meters down to 80, 160, and conceivably even lower if the radio equipment supports it.

This one piece of equipment could be used to build modular portable kits akin to commercial alternatives provided by Chameleon Antennas and Wolf River Coils, but with more versatility, creative potential, and at much lower cost. We look forward to writing about our experiences with this in the future.

The Lilygo T-TWR Plus seems to have potential as a lower cost Bluetooth packet TNC for APRS, as well as having some other potential for experimentation. We’ll relay anything of interest after the unit arrives.

One member’s direct drive 3D printer upgrade should make printing weatherproof parts easier and more reliable. Thoughts and prayers as always for the fickle 3D printing process.

Earlier this month, from May 10 – 13, the Earth was struck by the most powerful solar storm since 1989. This event caused radio blackouts on the HF bands, as well as disruption to the GPS network.

GPS disruptions forced farmers to halt planting for the entire day, as large-scale automated agricultural equipment relies on GPS for navigation.

Aurorae were visible in the Northern Hemisphere as far south as the Yucatán Peninsula, and as far north in the Southern Hemisphere as Queensland, Australia.

In comparison to the legendary Carrington Event superstorm of 1859, the solar storms of May 2024 were only about half as strong as the minimum estimated strength of -800 nT, and about 23% as strong as the maximum estimated strength of -1750 nT. The May 2024 solar storms reached a peak Dst index of −412 nT at 03:00 UTC on 11 May.

Please note that none of us are sun scientists or whatever. Here’s a video from Tamitha Skov, who understands this stuff way better than we do.

Radio Programming, Proprietary Software, and Plenty of Frustration

In the realm of amateur radio, good programming software is clutch. If you’ve ever spent hours tediously manually entering frequencies, offsets, and repeater codes, you know tools like CHIRP and RepeaterBook are essential. If you haven’t used these tools, check out some YouTube vids for CHIRP!

CHIRP supports a large variety of radios and is multi-platform, free, open-source software. If you can use it, you definitely should. It allows you to pull saved memories from your radio, import / export lists of entries, and pull from RepeaterBook to snag all the repeaters in your area (with slick filters for the band, mode, etc). So for example if we want all the 2 meter and 70cm repeaters using either FM or D-star within 20 miles of Atlanta, GA, we can pull that list and throw it on our mobile radio in seconds instead of spending error-prone hours of adding these manually on my rig.

So… good programming software for radios: clutch! The happy path? Dope. But not everything goes this smoothly; enter the cycle of frustration…

One of our members recently acquired an ICOM IC-7100. It’s a beloved options since it is dubbed an “all-band” transceiver. In addition to the HF bands, it also supports VHF/UHF and it has two SO-239 coax ports on the back so you can have both your HF and VHF/UHF antennas connected to the same radio. This “all-band” option is relatively rare and it makes for a great “shack-in-a-box” as some of the ham nerds refer to them. (We put all-band in quotes cause it supports all of the common amateur radio bands, but not literally all of them)

When our comrade excitedly began setting up their rig, it became rapidly apparent that CHIRP wasn’t going to happen. While support has been added for the 7100, there were some errors, missing fields, no way to work with multiple memory banks, etc. Of course within the open-source world, one should file a bug, give detailed steps of the issue and how to reproduce. We want tools like CHIRP to continue to grow and improve. But our friend was impatiently looking to other more immediate options to get on the air stat.

After some searching, multiple sources were pointing to RT Systems software for the 7100. Some YouTube videos showed a nice interface and pretty comprehensive support for all major settings / memory management. The downsides:

  • costs money
  • proprietary software (source code is not open)
  • not general purpose (separate software for each radio for some reason?)
  • does not support Linux

The last one was the real show stopper, but that was not gonna deter our automation-hungry anarcho ham. They took a gamble, threw down $25, snagged that disgusting .exe file, and crossed fingers. Running via wine was the first step. Misc errors, would kinda launch, then crash. Apparently the RT Systems devs said running this way is not possible. Next stop was VirtualBox (to run windows in a virtual machine and install on there). This worked! Well, the program installed and opened. The next problem seemed to be the usb connection to the radio was recognized on linux but not the Windows VM. After some fiddling, the key resolution was to:

1) install the Virtualbox extension pack (unsure if this step is actually essential)

2) determine device location of the usb radio connection (this is possible using CHIRP; download data from radio on there and the device file will look something like /dev/ttyUSB0)

3) Edit VM serial device settings. Choose COM1 for port num, port mode: Host device, port/file path: /dev/ttyUSB0 (or whatever you determined from step 2)

Now when you start the windows VM and launch the RT Systems software, make sure to select the appropriate port in the Comm port setup under the “Communication” menu setting. And then we can properly sync to/from radio!

So, in conclusion, proprietary windows-only software sucks. It is unfortunately quite common in the ham radio programming software ecosystem. As anarchists we vociferously advocate for free, multi-platform, open-source software, but sometimes compromises are inevitable when you’re impatient and just want to get repeaters on your goddamn radio. We hope this helps anyone facing similar frustrations!

april update

This is an update on some of our activities for the month of April, 2024. Hopefully everyone had a nice May Day! 🏴

Two comrades had a QSO on 20m SSB one evening. Distance approximately 600 miles.

RSTAntennaPower
Station A5-5EFHW inverted-vee20w
Station B5-8Random wire sloper100w

Two more comrades had a QSO on 40m SSB one evening. Distance approximately 1500 miles.

RSTAntennaPower
Station A2-2EFHW inverted-vee100w
Station B5-5shortened EFHW100w

One comrade made their first HF contact on 10 meter SSB phone, at a distance of over 2,000 miles at 100 watts.

One of us upgraded from Technician to General class license. They and a few others are studying for the Extra exam.

It’s definitely antenna season! One person has built a shortened end-fed halfwave and another is working on a 20 meter dipole.

A few air-core variable capacitors have been obtained for cheap from a hamfest. These are useful for building manual LC antenna tuners, crystal radio receivers, and probably a lot of other stuff.

We now have a PeerTube channel! There’s nothing interesting on there quite yet, but plans are percolating. In case you’re not familiar, PeerTube is a decentralized and federated video hosting platform. Think of it as the Fediverse alternative to YouTube.

A power supply upgrade has allowed one of us to finally make use of a cheap (~$75) 100 watt HF linear amplifier. While it does not appear possible to use digital modes with the amp, it has made SSB phone contacts significantly easier than in the past when limited to 20 watts. These PA-100 amps can be found on eBay from several different sellers. Some 50 watt kits can also be found for less money. Voice contact was made with Slovenia on 20 meters using this amp. Distance approximately 5,000 miles.

March Update

This is an update of some of our activities in the month of March, 2024.

Two new comrades have joined us this month! One from Appalachia, and another from the DC Metro area.

One was actually heard hunting POTA on 20 meters, after which we decided to connect over IP. Turns out he’s a long standing IWW member.

The other is a new ham with an interest in queer liberation and providing emergency communication support to the queer community.

We made use of webSDRs to remotely troubleshoot line-of-sight antenna setups.

One of us began construction of a portable 2 element Yagi antenna for the 10 meter band.

We experimented with multiple digital voice modes over both RF and IP, including DMR, YSF, Echolink, and M17.

Our comrades in the Midwest have constructed one fully functioning solar-powered Meshtastic node, and several portable nodes have been obtained by comrades there. Training and practice will commence when weather and schedules allow.

License exam study books have been scanned into digital formats for distribution throughout our networks.

February update

This is an update of some of our activities in the month of February, 2024.

Did an introductory video-conference presentation about ham radio to a group of comrades in the Northeast.

Two of us worked together remotely to get set up using CAT control and JS8call on one of our stations. CAT control works. However, the contact failed due to suspected coax problems. It was too cold outside to check. It was also suspected that one of the rigs suffered internal damage due to high SWR, but the problem appears to have been solved by a factory reset.

A second attempt was made a couple weeks later, this time using a Linux command line tool called minimodem which is a general purpose audio FSK modem capable of sending at very low bit rates, which, in theory should allow for a message to cut through very high noise levels. Experiments with very low audio (not RF) between two computers in the same building yielded promising results. We set our radios to VOX control and let it rip. No joy. One of the antennas was simply not radiating. The endfed random wire antenna that is proving to be problematic will likely be replaced with a soe form of multiband resonant dipole when the ice melts. Minimodem may get its own post in the future. There’s something to be said for such a simple and flexible command line utility, as opposed to more complex GUI applications such as FLDigi and JS8Call.

Solar powered Meshtastic modules have been ordered and should arrive soon. One Meshtastic device was given to a comrade who lives just beyond line of sight. Arrangements will be made to install the device on a mast, and attempt experimental contact when both parties have time. They are hopeful, as the mesh network is expanding in their localities and contact should be possible through at least two hops.

None of us have been affected by the AT&T outage. Although, it does serve as a stark reminder that whether due to disaster, malice, or sheer incompetence, governments and private corporations cannot always be trusted to maintain critical infrastructure.

January Update

This is an update of some of our activities for the month of January.

Shortly after tabling at an Anarchist book fair in December, we released an updated version of the zine, For an Anarchist Radio Relay League on this site.

One of us built an LCR meter from a kit. An LCR meter measures inductance, capacitance, and resistance of electronic components. It also tests transistors and crystal oscillators, as well containing a few other functions. This should help to adjust hand-wound inductors, and also to help identify mystery junk drawer components.

A few of us participated in Winter Field Day from our various locales. One of us made 47 contacts in one hour, the furthest being over 6,000 miles away Brazil.

Experiments with LoRa Meshtastic and Reticulum continue.

You should learn Morse code. Like, actually learn it.

tap tap tap…

This is somewhat less of an activist-oriented post, because shit would honestly have to be pretty fucking dire in the world for CW (we’ll get into why we call it that in a bit) to actually be practically useful. Not that such situations are impossible, and of course it’s worth thinking about and imagining, but we just don’t find them terribly likely. For a lot of people, Morse Code scratches an itch on a part of our brains that loves learning languages and sending secret codes. Anyhow, Morse code is cool and fun.

Hams call it CW, which stands for Continuous Wave. That’s because rather than modulating in response to the oscillations of a human voice or multiple tones of a digital signal, it uses one continuous tone generated by an oscillator. The oscillator is either On or Off. The circuit is either open or closed. The differences in the amounts of time the radio transmits is what creates the language.

And yes, it is a language. A relatively unique one, too because it’s neither a written language, nor a spoken one. It is sent by the hand, but also it is meant to be heard and experienced in time, not seen as dots and dashes on a piece of paper.

Now, CW is not unique in the sense that many other languages throughout the world have been developed for communicating over long distances using tones and rhythms. See African Talking Drums, and the abeng used by Jamaican Maroons to send coded messages.

Each combination of fist, key, and radio system has a “voice” which is as distinct as a human voice, and can be picked out among a pileup of other voices.

It is not exactly binary, even though it is regarded as the first digital mode. If anything, it’s Ternary. The “dits” and “dahs” are not equivalent to zeros and ones, because the gaps in between the tones are just as important as the tones themselves. For example “dah dit dah dit … dah dah dit dah” is “CQ” which is basically a way of saying “is anyone out there?” But if you change the timing to say “dah dit … dah dit … dah dah … dit dah” it says “NNMA” which probably doesn’t mean anything to anyone.

Computers aren’t very good at decoding CW. CW decoders do exist and are quite common, but they require a certain set of conditions in order to work properly. They expect tones in a certain range, a clear strong signal without any interference, and a very regular cadence. When CW is sent by a real human (especially with a straight key) on the real airwaves, using low power, a computer is of very little help. The human ear is much better at decoding this than a computer.

As far as radio communication goes, CW is the most efficient mode there is, by many standards.

Bandwidth: CW uses the smallest amount of bandwidth. Usually only about 500 Hz. Compare that to the typical 2400 Hz bandwidth of an SSB phone transmission.

Signal to noise: some “low signal” digital signals such as FT8 can be decoded by computer when it’s so deep into the noise that it can’t even be heard by the human ear. However, a skilled CW operator can decode CW that sounds exactly like static. That’s not easy to do with the human voice, and computers are not good at decoding messy CW.

Efficiency: You can probably squeeze more miles per watt out of CW than any other mode. Moreso, the equipment can be extremely small and lightweight.

IMG_20190324_124605
0.3 watt CW transceiver inside an Altoids tin, made by Adam K6ARK https://reflector.sota.org.uk/t/worlds-smallest-sota-station/20825/4
QCX-mini 5W CW transceiver
5 watt QCX Mini CW Transceiver from QRP-Labs http://shop.qrp-labs.com/qcxmini

A word about keys

There are several different types of CW keys, but most people either use a “straight key” or an “iambic paddle”. The straight key is the one most people are visually familiar with.

https://www.k6ix.net/J-38/Types/J-38-46-1F.jpg
J-38 straight key

The straight key produces “dits” and “dahs” by pressing down the key for shorter or longer periods of time.

Back when Morse Code was still a primary mode of long-distance communication, telegraphers – especially postal workers – primarily used straight keys. Prolonged use of straight keys caused a repetitive stress injury known as glass arm”. To prevent this from happening, keys were made which relied on a side-to-side motion such as semi-automatic keys called “bugs” and then iambic paddles.

Most modern radios have circuitry inside them which allow you to set the sending speed, so the duration of the “dits” and “dahs”. This enables the use of iambic paddles.

Search for “stainless steel iambic paddle” and you’ll find these all over the place for about $50. They’re pretty good.

Iambic paddles are pretty good. One of the paddles is “dit” and the other is “dah”. You can press them at the same time send “dit dah” or “dah dit” depending upon which paddle was pressed first. Very convenient. They allow you to send well formed characters very easily.

The dis/advantage of straight keys is that they almost force you to send slower. You also have to be very conscious of how long your dits and dahs are. On the air you can often tell when you’re talking to someone using a straight key because they can lean on the “dah” for what seems like an eternity once you get into the groove. The sounds may not be consistent relative to each other. A consistent and legible operator is said to have a “good fist”. The irregularity of the straight key may or may not be desired.

How to learn the Code:

The most important things to do are listening to and sending CW.

There are three main methods of teaching CW which are generally accepted: Koch, Farnsworth, and Instant Character Recognition (ICR). They’re all slightly different and tedious to explain, but we thought we’d point that out as they are terms you might come across.

Many tools exist to help people learn Morse code. Below is a non-exhaustive list of some options that are out there.

Videos:

Morse Code Ninja, Farnsworth Method

Websites:

Learn CW Online and Morse Code World are good learning tools. Morsle.fun is a game kind of like Wordle.

Software:

Morse Mania is an app for Android and iPhone. It’s good at teaching letters using the Koch method, but they want you to pay for numbers and punctuation. Rather than paying for software, you may want to move on to Morse Trainer (Android) which is open source and also uses the Koch method, but in a slightly different way. There are many different mobile applications

Learn from people: The Long Island CW Club and CW Academy are two groups that meet online and teach CW in different ways. Participation in both of these groups pretty much requires that you have both a Key and either a dedicated oscillator or a radio with a practice mode.

Long Island CW Club has regular Zoom meetings where people practice sending back and forth. There is no curriculum. You just show up to whichever meetings are convenient for you. There is a membership fee for LICW.

CW Academy is free, but it’s more structured. Students sign up for an 8 week long course consisting of two one-hour Zoom meetings per week.

How NOT to learn the Code:

Most skilled operators will advise that you NOT try to learn it visually. CW is an audible language, not a written one. Do NOT rely on a sheet of paper with the alphabet as a list of dots and dashes. The reason is basically that when you memorize the symbols in a visual way, you will always try and decode using a visual reference to each corresponding symbol, which is much slower than hearing the sound of each symbol.

Conclusion

So, while CW may not be particularly useful in the day-to-day, consider some of the information above. CW rigs are small and light. They don’t require computers or other equipment. The transmissions are very narrow-banded. CW signals can get out in very poor band conditions, when almost no other signal can. It’s a great emergency mode, and just another great skill to have.